Thursday, March 28, 2013

Curtain Call


Thanks to everyone who weighed in on my wallpaper dilemma. My handyman is working up a quote to do the planked walls. I'm hoping it will be inexpensive, so I can go for it!

In the meantime, I'll show you the shower curtain I chose...


It's from West Elm, and I love the navy and white stripes. So much prettier than the nasty shower door that used to occupy this space.


I really wanted to use a curved shower rod to make the shower more spacious. My tile goes all the way up to the ceiling though, and I didn't want to drill holes in it.

The solution was The Gripper Adjustable Curved Rod from Bed Bath & Beyond. It's a tension rod, so I could still get the curve but without damage to the tiles.


Some of the product reviews said that the rod gets rusty. I hope that doesn't happen, but I'm keeping the box and receipt just in case.

I'm going to be unplugged for awhile, as we're heading to Arizona for spring break. After this loooooong winter, I can't wait to get to the desert. We're visiting my best friend and her family in Carefree. How can you not relax in a place with a name like that?

Looking forward to catching up with you when I get back.

Tuesday, March 26, 2013

Pondering Planked Walls


Lately I've been pondering such questions as ...

  • Why is it that every time I have my carpet cleaned someone (dog or kid) vomits on it within 72 hours?? That happened yesterday right after I came inside from shoveling the snow off the driveway ... which leads me to my next question...

  • Why the heck are we having a snow storm in the Spring?? Darn groundhog. And finally...

  • Why did I pay someone to remove wallpaper and paint the kids' bathroom, only to discover that he painted over the wallpaper?


Sadly, I'm no closer to the answers. Whilst I pondered, I furiously scraped the bathroom walls.


I didn't get very far. Scraping wallpaper is hard. Scraping wallpaper with skim coat and three coats of paint is harder. Argh! Now my tennis elbow has flared up again.

Perhaps it would have been okay to leave the painted wallpaper, but I like things to be done the right way. And painting over wallpaper, to me, is just wrong.

So, now I find myself pondering the use of tongue and groove siding to cover up the nasty walls. This bathroom is my inspiration...


I've always loved the look of planked walls, but was reluctant to try it on perfectly decent walls. However, now that my walls are indecent, it could be a fun option. I'm not sure if it will work, as the bathroom baseboards are tile and the siding may be too thick. I'll keep you posted.

I'd love to know... have you ever used tongue and groove planks on interior walls? Would you use paint over wallpaper? Should we trust a groundhog?


Friday, March 22, 2013

Filling Holes in Ceramic Tile

Hey there! Didn't mean to be gone all week, but my little bathroom project turned out to be a bigger pain than I thought it would be. Go figure.

Anyway, when last I left you, I had just removed the ugly shower door from the kids' bathroom.


The shower door came off very easily. I simply lifted and removed the doors from the track. I then sliced the caulking with a razor blade, removed the top track, and unscrewed the frame. I scraped away the remaining caulk using Goo Gone and a razor blade. Pretty simple.

But, then I was left with 6 of these...


Holes in the tile.

I decided to fill the holes with marine and plastic putty.


This stuff worked great. I sliced off a bit of the tube, rolled it into little balls and stuffed it into each hole. I scraped off the excess with a putty knife.

In 24 hours, the putty was completely hard. It was ready to be sanded and painted.

And this, my friends, is where I hit a road block.

If my tile had been pure white, there would be no issue. You see, every porcelain repair kit or epoxy kit I could find came in "white." My tile is slightly off-white, and using white paint would just make the holes stand out even more.

This is why I haven't blogged for the past few days. I was using all my brain power to come up with a solution to my problem. Believe me, there isn't much left :)

Here's what I decided to do. I bought this...


Rust-oleum Appliance epoxy in "biscuit."

Now, I just wanted to touch up the small holes, so I sprayed some paint into a trim pan. Using a small paint brush, I dabbed the paint over the holes.


If you look closely, you'll see where I touched it up, but it blends in pretty darn well. And, from a distance, it really isn't noticeable.


Although from a distance, you can see how filthy the bathroom is :)

Things are going to get a whole lot worse in this room before they get better. My simple makeover is turning into a bit of a nightmare. But, that's a story for another day...

Have a fabulous weekend! And, if you have an ugly shower door, go rip it out!! You can do it :)

Monday, March 18, 2013

Updating Yet Another Bathroom


Top o' the morning to you! Hope you had a fun and festive St. Patrick's Day weekend.

Somewhere between green beer and the Irish jig, I started a new room makeover.


Meet my latest victim ...


Oh yes. Another bathroom. This one is so small it's difficult to photograph.


This is the "jack and jack" bathroom (we have no "jill") that lies between two kids' bedrooms. It basically consists of a shower, a toilet and a linen closet. The sinks are in the bedrooms.


The bathroom had shiny brass fixtures and typical 1980s wallpaper, complete with decorative "rope" border. But, honestly, it didn't bother me. It's a boys' bathroom after all. We're having a good day if there isn't pee on the floor and walls :)

However, there was recently a towel bar mishap that damaged the wall and ripped the wallpaper.


Darn ;)

So, the wallpaper came down and the walls were painted "Revere Pewter, " which is what I used in one of the adjoining bedrooms, the tween bedroom.

Then, this weekend as my husband was installing a new tissue paper holder in the room, I got a wild hair and removed the ugly shower door.


It was surprisingly easy to remove, and I love how much larger the room looks without it.

I'll be back soon with details on how to remove a shower door and repair holes in the tile. Had I known how easy it would be, I would have done it 5 years ago!

Have a great day :)


Friday, March 15, 2013

My Favorite Room


Today you can find me over at Kim's savvy, southern and stylish blog, appropriately named Savvy Southern Style.


I'll be sharing my favorite room as part of her popular weekly series, "My Favorite Room."


You'll never guess what room it is.

A huge thank you to Kim for inviting me to be a part of this fun series. She's sort of the Oprah Winfrey of blogland, so it's a treat to be on her "network." I hope you'll come visit me over at Savvy Southern Style.

TGIF, peeps!!


Monday, March 11, 2013

Tween Room Reveal

My oldest son's tween bedroom is finally complete! Good thing, too, as he'll be a teenager this summer. Gulp!

I really enjoyed working on a more grown up, masculine bedroom. With 4 little boys, I've had my fill of decorating with light blue, dinosaurs and cars. As a mom, I'm not wishing those things away. But from a design perspective, I was up for a new challenge.

Here is a "before" shot of the room. At the time, it belonged to my youngest son, who had just moved out of a crib. You can see the room has a rather funky layout. It's the smallest of the bedrooms and the angles make furniture placement challenging.


We played a game of musical bedrooms, and my oldest took over this space.


Come on in and check out his tween digs ...


The room was designed around the antique bed I found on craigslist.


There was really no option other than placing it in front of the window. But, I actually like how the window frames the bed.


The bed is dressed with striped sheets, an ivory quilt and a tartan wool blanket. I knew I wanted plaids in this room, and after an exhaustive search I was lucky to score the blanket at Home Goods for $40.


I like mixing plaids. This pillow came from William Sonoma. I thought about adding more pillows and shams, but let's face it. This is a boy's room. The pillows will never find their way back onto the bed in the mornings. Best to keep it simple.


On one side of the bed, I stacked some vintage suitcases atop a small trunk.


I like the texture and character they add to the room.


This small brass lamp was hanging out in my parent's attic. I gave the shade a little makeover, and now it fits in perfectly.


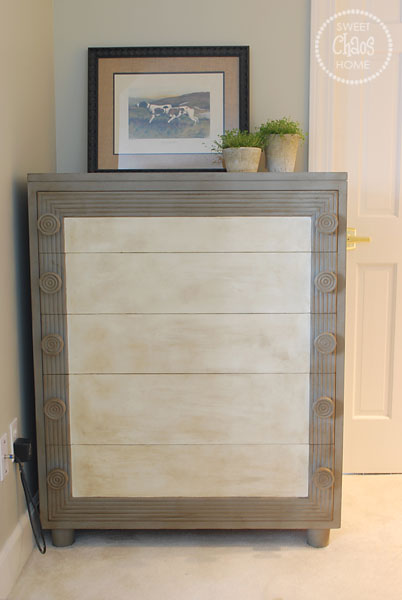
On the other side of the bed resides a small dresser that was previously used in the nursery. You can spot it in the "before" picture above. I gave it a faux zinc paint job, which turned it from a sweet little boy dresser into a rugged guy dresser :)


There were other furniture makeovers as well. This campaign desk was a craigslist find that got a facelift with fresh paint.


The desk lamp and framed dog print are from HG.


This formerly blonde dresser has been passed down for generations, and I gave it a new look with chalk paint. You can see the transformation HERE.


The frame on the dresser contains a cork board. I painted the cork with graphite chalk paint.


You may recall that I had done a large chalkboard gallery wall on this side of the room. But, I have to admit.... it wasn't working for me. It looked too cluttered. And, the last thing I need in my kids' rooms is more clutter.

I decided to simplify and just frame out a section of chalkboard.


I put the mod podge initial I made in the corner of the chalkboard.


A couple of views toward the other side of the room...


Through the door back there is a jack and jill bathroom. (In this house, it's known as a jack and jack bathroom.) You might spy a sink area in the back right corner of the bedroom. I'll be sprucing up that area as part of the bathroom's mini-makeover.


You might have noticed we went with a bit of dog art in the room.


This one was a little memorial to our yellow lab, Sadie, who died in October...


Another piece of art that is close to my heart is this one of a Bainbridge Island ferry.


When my oldest sons were 3 and 2 years old, we spent several months living on Bainbridge Island. Sadly, they don't remember it. But, this is a nice reminder to me of an adventurous time in our lives.


Of course, I couldn't resist adding another plaid into the mix with this houndstooth rug. I scored a great deal on it at a local design shop's annual clearance sale.


And that's the tween room in a nutshell!


I love this room, and find myself just staring at it from time to time. I hope you like it, too. Because honestly, my son could probably care less. Oh, he's polite about it and tells me that he likes what I'm doing. But, I'm sure a mattress and a pillow would have been just fine with him.


Sharing at Tuesday's TreasuresWow Us Wednesdays

Thursday, March 7, 2013

Dresser Makeover

I finally finished the last project in my son's bedroom.


This dresser belonged to my grandparents, then my parents, and most recently to my brother. When he moved into a swankier bachelor pad, he gave the dresser to me.

I knew I wanted to paint it, but I wasn't really sure what look I was after. So, I took a few months to think it over procrastinate.

I mean, why rush things? It's not like you're waiting for me to finish a room or anything. Sheesh.

After all that thinking, you'd think I'd come up with a brilliant idea. But, instead I went with my first thought which was to use chalkpaint. (Hey...if it ain't broke...)


I used French Linen on the outside of the dresser and drawer handles. The drawers are Old White.


I used dark wax over clear wax to finish 'er up.


Please excuse the ugly black plug. I would have removed it for your viewing pleasure, but somehow that one plug is responsible for our home's entire Wifi capability. I dare not mess with that.


So there you have it. The final piece to the "tween room" is complete.


Guess that means a room reveal is coming soon. I just need to dust, declutter, remove dirty laundry and make it look like my son lives like a civilized being. That might take a little time :)

Tuesday, March 5, 2013

Creating a Design Mood Board


I worked out this morning, and it was tough! I can barely move my arms. Now I'm eating Oreos. So I guess I'm still able to raise my hand to my mouth.

I know you won't believe it, but I am almost finished with my son's tween room. Good thing, as he'll be a teenager this summer. Then I'll have to start all over. Not.

I painted the final piece of furniture this weekend, so I've just got some tweaking to do and the room will be ready for its big reveal.

In the meantime, I thought I'd share a bedroom mood board that I created on Olioboard.


I'm donating design services to our elementary school auction next week, and I wanted to create some sample mood boards for the display.

This was so much fun, because I didn't have to worry about an actual budget. I just picked items I liked. Oh wouldn't it be great if that were real life?

Have you ever used olioboard? I have Photoshop Elements, and I suppose I could figure out how to create design boards on there, too. But this is a really quick and easy way to play around with various pieces to create the aesthetic you desire. Then, you can hunt down less expensive items to mimic the look.

Warning: It can be addictive. Just like Oreos.

Friday, March 1, 2013

Friendly Places Home Tour #7


Let's head into the weekend with a little home tour, shall we?

Today's "friendly place" is the home of my sweet friend (and tennis buddy), Kerry. 


After moving three times in 7 years, Kerry and her family had become pros at moving into a house, settling in quickly, and turning the house into a home.


Kerry had originally hoped to find new construction, but wasn't finding anything in the area she was targeting. Then she stumbled upon this house. It was a bit older and lacking some of the features she wanted, but more square footage and a gorgeous pool won her over.


So far I haven't seen any lacking features, have you?


Kerry did a complete paint makeover of the house, using many of the paint colors she had used in her previous home. 


I love this sunroom with a fireplace off the kitchen.


Notice the silver champagne bucket in Kerry's dining room? It's actually her husband's tennis trophy...


I've got to improve my tennis game. All I've ever won is a bag tag, which doesn't really go with my home decor. But, I digress.

Oh Maria... Louis chairs, a settee, a piano and a garden stool... these are a few of my favorite things!


Home office...


How clever is this salvaged kitchen cabinet turned bookcase? ...


Master Bedroom...


Guest bedroom...


Kerry did a wonderful job using what she had in her previous house and making it fit beautifully in this home. Her family has lived in the house for 5 years now and aren't planning to move any time in the near future. So, Kerry is excited to make some changes and tackle projects to fit her changing style.


She loves antiques and vintage items, but also loves the lighter, brighter looks that are trending right now. She's enjoying the challenge of merging her tastes. 

And, fortunately for us, Kerry has started a blog to document the evolution of her home. Stop by and visit her at homecrushblog.com. I'm sure she'd love to "meet" you.


And, if you're lucky, she'll serve you a drink poolside.

Well, maybe not just yet... but summer is getting closer. Happy March!!