Showing posts with label master bathroom renovation. Show all posts

Friday, April 29, 2011

Bathroom Source Guide

Happy Friday! If you are visiting for the first time... Welcome to Sweet Chaos! I know a lot of you are here from Southern Hospitality. Rhoda was so sweet to feature our master bathroom renovation on her blog today. Thank you for visiting, and I hope you'll stay for awhile :)

I started this blog at the same time our bathroom renovation got underway. If you've spent any time here, you've seen more posts on our bathroom than you can probably stand. (I promise... there are plenty of other rooms that need facelifts. I won't bore you with the bathroom forever :) ) However, I've received a lot of e-mails asking about specific items that we used in the room. I thought it would be nice to have all the details in one place. So here it goes...


1. Bath tub:  Victoria & Albert York tub
2. Tub Filler: Barclay
3. Floor tile: Ceramica Magica Pitti in Blue
4. Shower floor tile: 2 x 2 honed carrara marble mosaic
Subway tile: Daltile Arctic White
5. Accent tile: 1 x 1 ming green marble/glass mosaic
6. Sink faucets: Newport Brass Bridge Faucet
7. Frosted Glass Door: Home Depot Feather River Privacy Door
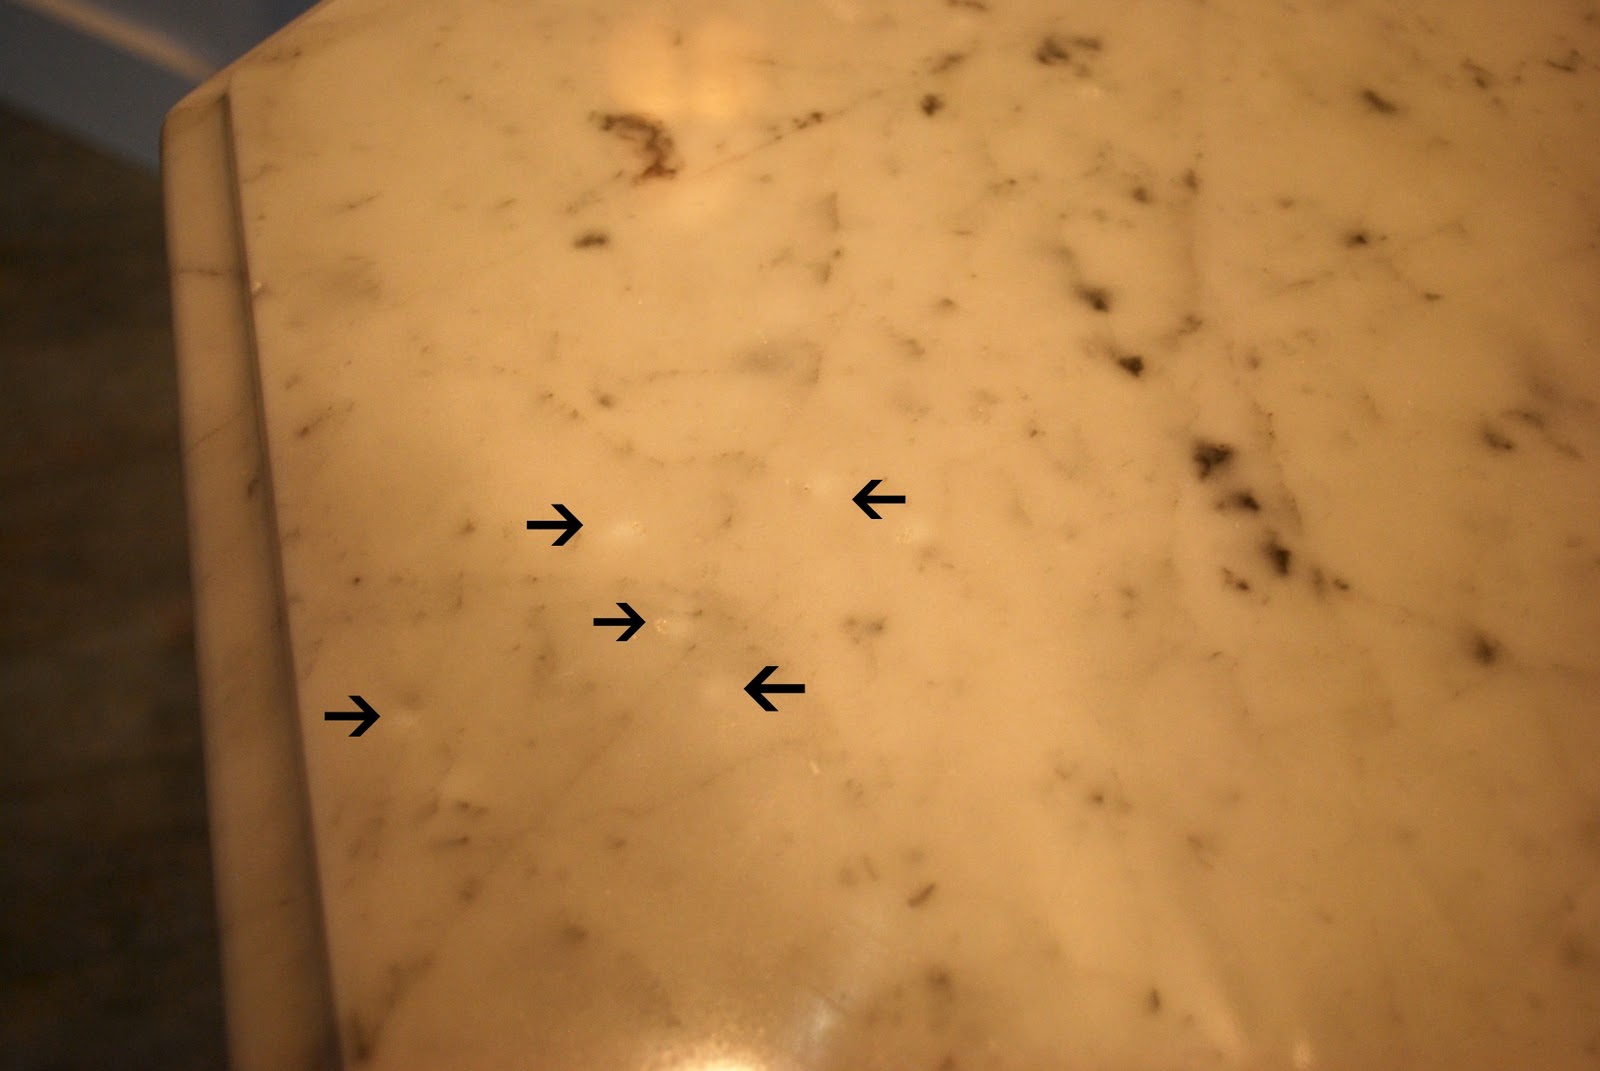
8. Countertops: Carrara Marble, polished
9. Sconces: Restoration Hardware
10. Wall color: Sherwin Williams' Sea Salt
Cabinet and Wainscoting paint color: Sherwin Williams' Pure White
11. Drawer knobs: Emteck Crystal & Chrome
12. Drawer pulls: Brass Accents Traditional Pull in Chrome
13. Freestanding towel rack: Restoration Hardware
14. Towel hook: Restoration Hardware
15. Shower fixtures: Hansgrohe
16. Toilet: Toto


I hope I haven't forgotten anything! Of course, I am always happy to answer questions or provide more details. So, please... ask away! I love hearing from you. The best part of blogging for me is being able to exchange information and get to know you better.

I'll be back soon with the latest Mudroom update. Have a great weekend! 

Wednesday, April 13, 2011

A Little Bathroom Bling

Thought I'd share a few of the finishing touches that were added to the master bathroom today.  Finally, the knobs and pulls were installed...


I thought about abandoning personal hygiene in an attempt to keep the new shower clutter-free. Instead, I replaced our big, messy shampoo bottles with these sweet little acrylic ones. I scored them at Home Goods for $7 each. Notice how our shampoo and conditioner colors complement the color of the mosaic tile.  And, I didn't even plan that :)


I am bound and determined to keep the marble countertops as pristine as possible. I put a pretty soap dispenser by each sink.  I bought a coordinating toothbrush holder, but that will definitely be kept out of sight.


I hated the thought of "junking" up the pretty wainscoting with towel bars. Towel rings wouldn't work well, because the towels hung too low and dragged on the countertops. These small hand towel bars (from Lowe's) were a great find. They don't take up much space.


Now I just need some pretty towels to hang on them! I'm on the hunt for a couple sets of new towels. Restoration Hardware's Silver Sage towels go pretty well with the wall color, but I'm hoping to find something with a bit of a pattern to it. Would love to hear if you have any favorite towels that you recommend!


Our master bathroom is the one shiny, brand-new, clutter-free space in our house, and I intend to keep it that way for as long as I possibly can. I just need to keep the door to the closet shut...


.... because it's a whole different story in there!

Thursday, April 7, 2011

Feeling the Love and ... The Shower Verdict Is In

Hello, friends! I'm back from the "Happiest Place on Earth," and I think I may be the happiest girl on earth this week. I have received so many wonderfully kind comments and e-mails about my bathroom remodel. You all sure know how to make a girl feel good!

I'm so grateful to those of you who have been with me from the beginning, and those of you who have just joined us. You put the "sweet" in Sweet Chaos!

I can't even express how blown away I was by the other bloggers who featured my remodel. Please see the "I Was Featured" section of my sidebar. If you don't follow these fantastic blogs yet, you should stop by and see what you're missing!

Among the feedback I received about the remodel were several questions involving the shower.


Allow me to answer your burning (or should I say freezing) question regarding our open shower. Inquiring minds wanted to know if it was cold in there and if the water splashed outside the half walls.

I hate to admit it, but I couldn't answer those questions until today. You see, I was a bit of a freak about the remodel. I wanted everything done and perfect and blog pictures taken before I would let anyone use the shower. Since we left for vacation as soon as the bathroom was complete, we didn't use the shower until this morning.

I took the first shower, and I used the slidebar showerhead only. The verdict.... No water splashed outside of the shower walls, and I was not cold. Even when I moved out from under the direct spray to shave the old legs, I still did not feel chilled. The shower passed its first test!


P.Daddy took his shower next, and he went all out with the rainshower and the slidebar showerhead. The rainshower would be the true test, as it's closer to the half walls and directly over the drain. If any water was going to escape, this would be the ultimate time for it to happen.  The verdict... still no water splashing over the half walls. Even the marble tops remained dry. The threshold did get a bit wet, but that was it. Success!


If you are considering an open shower, remember that size matters. If you don't want water everywhere, it's best to make the shower area as large as possible. If your room is chilly to begin with, I would not do an open shower. But, if you have a warm room, or you can put in heated floors, I say go for it! I mean, is there anyone out there who actually enjoys cleaning glass??


Tuesday, March 29, 2011

Master Bathroom Reveal

Yes, friends, the day has arrived. Today I will unveil our almost completed master bathroom. I say almost because we are still waiting for the drawer hardware and plantation shutters to be installed. However, you have been so patient that I can't make you wait any longer. 

Thank you for sticking with me through the planning, process, excitement, complaints, tantrums and fun of this remodel. It's been a rollercoaster. I've enjoyed the ride. But, I'm glad it's almost over.

Let's take a little stroll down memory lane, shall we? Enjoy your last look at the lovely yellow wallpaper, white carpet, and indoor swimming pool bathtub.


I'm sure this bathroom was quite a gem back in the late 80s, but she definitely needed a makeover. Are you ready to see what she looks like today?  Come on in...


You may be wondering, "Carolyn, you just lived through your first major home remodeling project. What are you going to do now?"

Well, folks.... "I'm going to Disneyworld!" 

For the next few days, the only houses I care about are Cinderella's Castle and Mickey's Toon Town home. I hope you'll meet me back here when I return, because I've got lots more projects in the works.


Cheers!


I'm linking up to...

Show and Share Day at Just A Girl
Whassup Wednesday
Wow Us Wednesdays
Swing Into Spring
Tuesday's Treasures
Share the Love Wednesday
Transformation Thursday
Open House Party Thursdays
Show and Tell Friday
I Party at Type A
DebbieDoo's Blogging and Blabbing Newbie Party
Metamorphosis Monday


beforeAndAfterButton


Saturday, March 19, 2011

An Update on the Bathroom and A Bathroom Update

I am sure you have all been sick with worry over what happened with our marble countertop. Okay, well, perhaps not. However, if you are the least bit curious... the crisis is over. If you weren't aware there was a crisis, you can read all about it here.

Mister Marble came out to work his magic, and he was able to get the little "pits" much smoother. He also re-polished the countertop. It's an improvement, but it's not perfect. We had a decision to make. Ask for a replacement or ask for a refund. My husband was most definitely leaning toward the refund. He wanted this job DONE. Yesterday. Replacing the countertop would mean weeks or even months of waiting.

I was in favor of asking for a replacement. However, I did a lot of research and called several marble suppliers and fabricators. Two of the suppliers said that for the past 10 years or so, the carrara marble has been coming in with "bubbles." That sounds nicer than "pits," doesn't it? 

After much debate and many sleepless nights, we ended up negotiating a refund that we were pleased with.  Now we can finally finish this project!!  I'm hoping my camera cooperates, and I can take some nice photos of the finished bathroom and post them this week. 

In the meantime, I decided to make some small changes in my boys' bathroom vanity area. I replaced the shiny brass towel racks with the oil-rubbed bronze ones that were previously in our master bathroom.

Before...

and After...


I also replaced the plain brass knobs with something a bit more interesting...


And, hopefully, this weekend I will be replacing the current faucet...


with this...


As I worked on these small projects, I discovered some material for my first-ever tutorial. I'm quite certain the topic has never been covered by another blogger. I'm thinking of calling it, "How to clean up after boys who brush their teeth in such a manner that more toothpaste ends up in the cabinet drawers and on the walls than on their teeth."  Case in point...


YUCK. I'm wondering how my children could even get the toothpaste up as high on the walls as they did.  I envision them filling their mouths with toothpaste and shaking their heads like wet dogs until the paste splatters in every direction.

The toothpaste on the walls came off quite easily with my handy dandy Clorox wipes. The toothpaste plastered to the drawers required the use of a screwdriver to pry it free, and then a good 'ole scrubbing. To avoid the mini-toothpaste sculptures from forming on the wood drawers in the future, I lined the drawers with my all-time favorite shelf liner...


Ahhh... that's better...


As I measured and cut the shelf liner, I wondered why I hadn't done this sooner. I mean, it only takes a few minutes of time.

But when I went downstairs and found our dog happily chowing down on food that my 2-year-old was shoveling repeatedly into her bowl, I remembered why I don't get these seemingly small projects done. I'll probably be cleaning up after the over-fed dog in a couple of hours, if you know what I mean...

Monday, March 7, 2011

Mister Marble and the Mad Housewife

First of all, a great big thank you to everyone who weighed in on our marble countertop dilemma.  We met with our contractor yesterday, and she assures me that she has a guy, Mr. Marble, who will be able to fix the countertop to our satisfaction.  He will be out here mid-week to have a go at it, so we'll see what happens. Crossing my fingers...

You may have sensed that the marble situation was affecting my mood. But this gift from a friend really cheered me up... 


I had never seen this wine before, so it really made me smile...


Is it too early for happy hour?

Friday, March 4, 2011

Help Wanted

Oh, we got trouble. Right here in River City. That's trouble with a capital "T."  That rhymes with "C." That stands for Countertop.

Thought I might be able to lighten the mood around here by setting our latest remodeling problem to the tune of a Broadway musical.  I'm not entirely sure that it's working, but at least I'm humming songs from "Music Man," instead of mumbling some other choice words.

Now, I really don't want to complain.  Seriously, I don't.  I am beyond grateful to be able to remodel our master bathroom, and I know it will all be beautiful in the end.  But, I just wanted to share a little predicament with you.  Perhaps you can help me decide what to do.

We are sooooo close to the end of this remodel.  We're talking a cabinet door, a couple of mirrors, drawer pulls and a toilet paper holder, and we're DONE!!!!  But, a seemingly minor issue that we had a couple of weeks ago reared its ugly head yesterday, and I'm fearing a major setback could result.

Here's the deal...

When the trim guy was installing our upper cabinet (the one that didn't fit and had to be replaced that I wrote about here), he must have slid it across the marble and scratched the countertop.  I pointed it out to our contractors who assured me they would have it buffed out and it would be good as new.

Well, we had it buffed yesterday, and it's not good as new.  It's more like "good as a couple years old and several things dropped on it."  The reason for this, according to the countertop fabricator, is that marble has little pits under the surface.  When it is buffed, essentially the top layer of stone is removed, and the pits are brought to the surface.  They then appear to be little nicks like this.


Okay, I know it's really hard to see in this picture.  But, trust me, it's the pits!

We haven't even told our contractors about the buffing results.  You know, because they haven't bothered to call or stop by to see how it turned out, because they care so much... Oh, that sounded like complaining.  Sorry! 

So, we are left with a choice.  Live with the countertop and accept the imperfections OR have the countertop replaced.  If we go the replacement route, we would have to have all the upper cabinetry and trim removed, the plumbing disconnected, the sconces disconnected, the sinks replaced AND we would have to wait until another slab of marble was available.  Which means this bathroom ain't gettin' done anytime soon.

What would you do? 

(That's not a rhetorical question, people.  Please post a comment and help a girl out.) Thank you!

Thursday, March 3, 2011

What's Behind Door #3?

My bathroom remodeling project has opened a lot of doors for me.  I mean, literally. There have been doors. Three different doors to be exact.

One of the biggest challenges in designing the new layout for the bathroom was the door between the master bedroom and bathroom.  The original door, which swung into the bathroom, would not work with the design that I wanted.  If it swung open to the left, it would block the closet door, and if it swung in the other direction, it would block the entrance to the water closet.


We thought about reversing it, and having it pull open into the bedroom.  But, that didn't work either.  A pocket door was the logical solution, and we were thrilled to learn that the existing wall could accommodate one.

Originally, I had envisioned a frosted glass pocket door, but the ones my contractor showed me were too expensive, and a bit too ornate for my taste.  We decided that they would just put in a 6 panel wood door to match the other doors in our home.

Now, I have to tell you that one of the things I love about my house is the fact that it is really well-built.  The builder used quality materials and paid attention to detail.  So, when the contractor said he'd match the door to the others in the house, I expected to see a door of the same quality.  Imagine my surprise, when I saw what was behind Door #1.

The door was hollow, had a lovely raised faux wood grain (you know, to make it look authentic), and was feather-light.  I'm fairly certain that there was no real wood involved at all in the making of Door #1.  Keep in mind that I'm going to be locking myself into the bathroom to escape little people, but that doesn't mean little people won't be knocking on the door.  I also know a certain 2-year-old who would have a lot of fun sliding the door open and closed.  One false move, and that bad boy (the door... not the kid) would be coming off its track.  

We expressed our concern to our contractor, and he had a solution.  He would take our original door, fill in the hole where the hardware had been, and turn it into a pocket door.  Thus, the original door became Door #2.

But, in true "game show" fashion, I was still nagged by the thought that another door could reveal something a bit more exciting.  I was perusing some design blogs one night when I stumbled upon this beautiful bedroom and bathroom remodel by Chania at Razmataz.  You can check it out here.  I saw her door, and my heart stopped. 


Not only was this door the one I had originally envisioned for my space, Chania had scored it for a mere $99 at Home Depot.  Cha-ching!  I couldn't get to HD fast enough.

I found a similar door, but not at the same amazing price.  Wah wah wah...  However, it was much less expensive than the original frosted glass door options, far superior quality to Door #1, and a lot more exciting than Door #2.


Well, shut the door!  I love it!

The door situation taught me a valuable lesson.  When you are working with a contractor, don't expect him/her to ask your approval on every detail.  You need to ask questions, be very specific about what you want, and stay on top of all the details.  If you don't, you may end up staring at an ugly composite door for the rest of your life.

So now you know the story behind the door.  Wait til you hear about the windows...

Friday, February 25, 2011

Mishaps, Mood Swings and Momentum

On Wednesday evening my 10-year-old asked me if I was sad.  I explained that I wasn't sad.  I was just frustrated by the remodel.  He said, "well, at least you have something to blog about."

It's true.  Through all the ups and downs of the remodel rollercoaster, blogging has helped me to put things in perspective and find the humor in otherwise annoying situations.  After all, if the remodel went off without a hitch it would be wonderful, but it wouldn't make a very interesting story.  So, I sat at my computer and tried to write about the day's events.

I tried to come up with an amusing way to tell you that I had spent a good part of the day painting one of the bathroom walls, because no one from the crew was here to do it, and the plumber was ready to install the tub against that wall.  I thought I'd title it, "If You Want Something Done Right, Do It Yourself."  But, try as I might, I couldn't take a light-hearted approach to that one.

I tried to craft a funny anecdote about how the painter (not me... the "professional" one) left a wet paint pan on top of a box containing my very beautiful and very expensive tub filler.  And about how we discovered said tub filler completely covered in paint.  And about how I spent an hour soaking the tub filler in warm water and scraping the paint from every nook and cranny with a tooth pick and still couldn't get it clean.  I don't know what was wrong with me, but the tone of the writing was more bitter than witty. 

I was in a bad mood and blogging couldn't change it.  I knew whatever I wrote about that night, I would end up regretting in the morning. 

Luckily, Thursday came along, and my mood lifted.  There seemed to be a surge in momentum on the job site.  Things were coming together again, and I started to see the light at the end of the tunnel.  Or, maybe I was just seeing the light because all the sconces and can lights were finally installed.


 My tub finally made it out of the box, and I'm happy to report that I LOVE it!


The paint that isn't on the tub filler made it's way onto the walls. 


And, though it's not nearly as glamorous as the tub, the toilet is now functional.


Despite the mishaps, my mood is better and I'm hoping the momentum continues.  TGIF and one more day til my IKEA roadtrip... YAY!  Have a great weekend :) 


Monday, February 21, 2011

Cue the Crickets

Shhhh!  Do you hear that?  Nothing?  Do you know what that sound is?  That's the sound of complete silence coming from our master bathroom.  No hammers, no drills, no nail guns, no work being done.  I've been listening to that silence for 4 days, and I've got to tell you...  I don't like it.

In our house, there is always lots of noise ... children fighting, crying, and whining laughing, giggling, squealing with delight; mom yelling humming and whistling whilst she works; dog barking (and this week with a virus also coughing and gagging); piano and guitars being played, pots and pans being played; video games beeping and whirring; TV and iPods blasting.  One would think that quiet would be a welcome change.  And, believe me, when the remodel is complete, it will be more than welcome.  The only sound I want to hear when I am in my sanctuary is the peaceful water filling the tub.

But, until that day comes, bring on the power tools! 


Now, if you'll excuse me, I need to go to my happy place for awhile.  Oh, I didn't mean to be rude.  You're welcome to join me.

Coastal Living
.
Ahhhh... Do you hear that?  That's the sound of complete silence.


Don't forget that you only have until 8pm tonight, February 21st to enter my giveaway, a $30 gift certificate to whimsy studios' etsy store.  Check out the details here!  Lori's art is guaranteed to bring you to a "happy place."

Friday, February 18, 2011

Progress and Setbacks

Remodeling lesson #5,231:  Never, ever let the following words escape your lips... "The project should be done by the end of the week." 

Those words are the kiss of death!  Well, perhaps that's a bit extreme, but those words could definitely turn around and bite you, as they did me.  You see, Tuesday I was doing a happy dance and singing the Pointer Sisters' "I'm So Excited" in my head.  Everything was rolling right along in the master bathroom. 

The shower was grouted...


The carrara marble sills were installed...


The crown moulding went up...


My little guy was living every 2 year old boy's dream, peeking into the room and watching power tools in action...


The countertop and sinks were installed ...


The cabinetry was being completed...


EEEEEEKKKKKK.... (that's the sound of screeching brakes)... let's revisit the cabinetry, shall we?


Do you see a problem?  I didn't notice it right away, but the faucets are not centered between the two columns.  In fact, there is a good 4" difference on either side.  Ugh! 

Long story short, our cabinetmaker had made some changes to the dimensions of the bottom cabinets, but had not made the appropriate adjustments to the upper cabinet.  Sadly, the result is that my spacious 24" upper cabinet now must be replaced by an 18" cabinet.  I'm not thrilled, but I'm learning that when it comes to remodeling, some things that you hope will be perfect may just have to be good enough. Hmmm... that's becoming a bit of a mantra around here.

It's amazing how one small mistake sets back an entire project.  We have to wait for the new cabinet before the trimwork can be finished, before the painting can be completed, before the tub and plumbing fixtures can be installed, before the electrician can hook up all the light fixtures, before I can soak in the tub with a glass of champagne.

I thought I would be revealing the completed bathroom today, but now it looks as if it should be done at the end of next week  it will have to wait.

**GIVEAWAY REMINDER**  $30 gift certificate to whimsy studios' etsy store.

You still have until Sunday, February 21 at 8pm to enter.  Giveaway is open to everyone, whether you're a regular follower or just stopped by for the first time!

This print from whimsy studios really spoke to me this week ...


Have a great weekend!