Friday, August 31, 2012

Dressing A Bed

Gone are the days of matchy matchy bedding sets, where the sheets, comforter, shams and bedskirts all share the same design, giving you the "bed in a bag" look.

Well, I guess they are still around, but let's all agree that they shouldn't be. Okay?

A bed looks so much more cozy and interesting with the right "apparel." In fact, clothing can be great inspiration for the bedding we choose.

I'd like to dress the bed in my son's room like this guy...


I love the stripes, plaid and houndstooth grounded with a neutral overcoat. Wouldn't these fabrics make for a great looking bed?

Better than this anyway...

Bed in a Bag clothing


So far my son's bed has a wardrobe that consists of a striped dress shirt..

Pottery Barn Jackson Stripe Sheets

and a neutral overcoat.

Pottery Barn Pickstitch quilt in Ivory


 I'm still looking for the perfect plaid blazer. These are a few I'm considering...

MacKenzie Tartan from The Scottish Weaver

MacLeod tartan from The Scottish Weaver


Gordon Dress tartan from The Scottish Weaver


via mexchic on etsy


I am feeling totally indecisive on which plaid to choose, so if you have an opinion please leave me a comment! There are too many good options!!

Once I make a decision on the "blazer," I'll be adding some "scarves" (aka pillows). I'm thinking a mix of windowpane and buffalo check plaids in neutral tones.


And, of course, there's the equivalent of the man's monogrammed handkerchief ...

via tootledoodesigns on etsy

Next time you need to dress a bed, consider taking a look at your favorite fashions. It may just provide inspiration beyond the "bed in the bag."


But, please remember this. Although your bedding may be inspired by clothing, don't ever wear your bedding out in public.


Have a great weekend :)

Wednesday, August 29, 2012

Spray Painted Lampshade

Do you have a lamp that could use a little facelift? Why not give it a little spray?

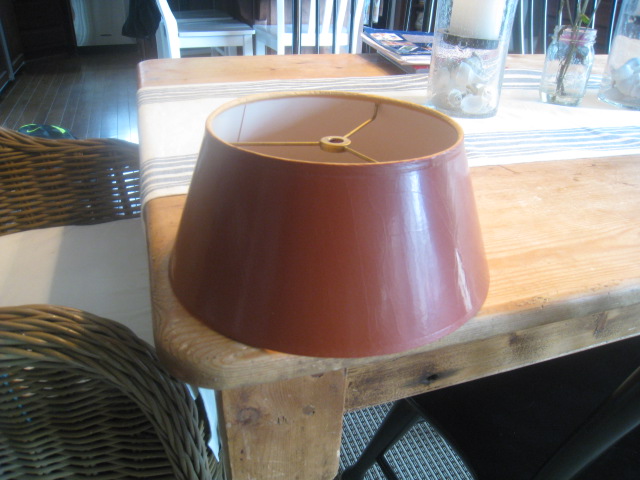
My mom found this little brass desk lamp in her attic, and gave it to me for my son's bedroom.


I love free stuff, but I wasn't totally digging the color of the lampshade.


I thought about shopping for a replacement shade, but then a lightbulb went off (get it?) ... why not spray paint it?

First, I taped a plastic bag inside the shade so I wouldn't splatter paint all over it.


I used a Home Goods bag, but any bag will do :)


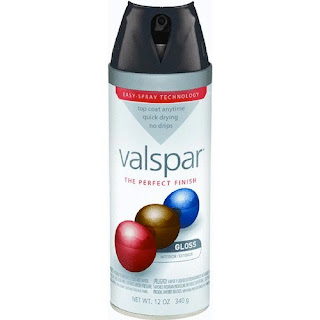
My spray of choice...


Actually I sent my husband to the hardware store, and this is what he came back with. But, I will say that it worked great. No streaks or dripping paint. Easy to use. Dried fast.


Thirty minutes later, his facelift was complete...


What's your favorite thing to spray paint? I've got lots of leftover paint, and I need some inspiration :)

Monday, August 27, 2012

Faux Zinc Dresser


Hey there! How was your weekend? My sister was in town, and we ended up spending too much money shopping in Anthropologie. It's amazing how quickly those sale items add up, isn't it?

Good thing the latest addition to my son's "tween" room, didn't cost me a dime. Using supplies I already had on hand, I created this faux zinc dresser.


I want the room to have a classic, masculine look with a touch of industrial chic thrown in. So, when I saw this paint technique over at Melaine's blog, I knew it would be perfect for my son's room.

The dresser I used for this project has been in my family for a long time. It was used in my uncle's childhood bedroom, and somehow ended up in my parents' house. When I moved into my first apartment after college, I confiscated it from my parents. I painted it white and used it as a nightstand for many years.

When I was pregnant for the first time, I painted the drawer pulls to suit a baby nursery.

Before

If I had known that I would have 4 boys, I would've skipped the pink and purple :)

Anyway, this little dresser has served our babies well for the past 12 years. But now that the boys are getting older, it's time for this dresser to get a more grown up look, too.

I used supplies that I already had on hand.


I painted the entire piece with two coats of ASCP in Graphite.


When it dried, I put little drops of the metallic paint on top of the dresser. Following Melaine's tutorial, I dipped my paint brush in ASCP soft wax, and brushed through the drops of metallic paint.

If you want more control over the metallic paint, brush the wax on a section of the furniture first. Then put the metallic paint on a paper plate and lightly dab it on the brush before applying it to the furniture.

I finished by pouncing some dark wax in random spots for added dimension.


This is a great paint technique for painters of any skill level. You really can't mess it up. Just play around with it until you get the look you want.

I've made some more progress in this room. I'll be back soon to show you. Have a great day!!


Sharing at 

Miss Mustard Seed's Furniture Feature Friday Make It Pretty Monday
Tuesday's Treasures
Cowgirl Up! Link Party
Shades of Amber Chalk Paint Party
Wow Us Wednesdays

Tuesday, August 21, 2012

Breaking Design Rules


You know the design rule that says you should never place a bed in front of a window? Yeah, well... I broke it.

You know what else? I'm so glad I did.

I'm working on my son's room, which is awkwardly shaped. I tried to avoid putting his full-size bed in front of the window. But, it just wasn't working for me on the only other wall where it would actually fit. The traffic pattern was weird and disjointed. 

So, I moved things around, and this is what we have now...


I'm sure Feng Shui experts everywhere are cringing, but this bed is staying put. Not just because I have tennis elbow and can't bear to move it again, but because I really like it here.

It's ironic that the child who will sleep in this room is my biggest rule follower. Thankfully, he is unaware of design rules or he would probably refuse to sleep in here :)

Obviously, I still have a looooong way to go til this room is ready, but I did score a couple of new pieces for it. A local design studio was having a warehouse sale on Friday, and I brought home those two prints on the wall. I know they look a bit strange the way they're hung. I literally stuck them on nails that were still in the wall from when this room was a nursery. I also still have the tags on them. Don't judge. I'll hang them properly one of these days. At least they're not on the floor.

I also picked up a navy houndstooth rug.


Nothing like blurry photos of a houndstooth rug... whoa! Are you dizzy? 

I spent part of the day painting furniture for this room. And, I picked up a pretty cool craigslist desk this weekend. Stay tuned...

Have you broken any rules lately?


Friday, August 17, 2012

Client Project Reveal

Earlier this summer I showed you some items I was using in a bathroom remodeling project for my client, Kathy. We still have a few accessories to add, but the room is done enough to let you in.

This is how the room looked before ...

BATHROOM "BEFORE"

It really wasn't bad. Just a bit outdated with the brass fixtures and cultured marble countertops.

Kathy didn't want to throw the baby out with the bath water. (Sorry. I couldn't resist.)  The floor tile, shower, tub and cabinetry were all staying put. She wanted an updated look, without a major overhaul.

We started by updating the shower with a frameless shower door enclosure.

SHOWER "AFTER"

This simple change really opens up the space and makes the shower appear taller. A new chrome extendable shower head takes the place of the small brass wall unit.


HER VANITY "BEFORE"


HER VANITY "AFTER"
Kathy's vanity was updated with carrara marble countertops, chrome and porcelain faucets and crystal knobs. The cabinetry was trimmed out at the bottom to look more like custom furniture.

A new mirror flanked by sconces replaces the builder-grade mirror and overhead lighting.

HIS VANITY "BEFORE"

Across the room, Kathy's husband's vanity received a similar makeover. It is a really small space, but we still managed to fit a mirror and sconces above it.

HIS VANITY "AFTER"


I lost serious sleep over this vanity, but I think it turned out beautifully.


BATHTUB "BEFORE"

The original bathtub was perfectly fine, but rather plain. 


BATHTUB "AFTER"


The surround was given a much more finished look with the addition of wood paneling. The walls are painted Sherwin William's Sea Salt. (What can I say? It's a favorite!) We added a gorgeous mock roman shade to the windows.


My photos are not doing it justice, but hopefully you can get the idea. You can also see the thick crown molding we added to the entire room. It makes such a huge difference in giving the room a "finished" look.

I hope you love Kathy's new and improved bathroom as much as I do. I'm hoping to have before and after photos of her master bedroom soon.

Have a great weekend!!


Sharing at ... 

Tuesday's Treasures
Wow Us Wednesdays

Friday, August 10, 2012

Chalkboard Wall


I've been thinking that chalkboard walls would be fun in the kids' bedrooms.


When I mentioned the idea to my kids, they were all for it. Especially my 10 year old. He kept hounding me to get started, and I finally did this past weekend.

Originally we were going to paint an entire wall, but instead we decided to paint just a section of the wall.


I really didn't measure or make perfectly straight lines. I'm lazy daring like that. If it looked really bad, I'd just paint the entire wall. Makes sense, right? Sort of.

This was my product of choice...


Honestly, it was the only one I could find.


Two coats of paint, tape removed, and this is what we ended up with...


Well, look at that. It's already being put to good use.


Hmmmm... I may need my entire house to be painted with chalkboard paint :)

Have a great weekend!


Thursday, August 9, 2012

Plaid Madness


Now that the "tween" has a bed, it's time to think about bedding. And, I think a plaid blanket at the foot of the bed is a must. Love this look...


I like the look of the earthy brown tones.


I cringed when my son said his favorite color was lime green, but this next tartan plaid has a nice shade of green that might pass for "lime."


There are soooo many amazing plaids out there. It's overwhelming!


Of course, who says I have to pick just one ?


Have you decorated with plaid? Do you have a favorite?