Thursday, May 29, 2014

A Weathered Table


This table sits in our family room, and has endured many small hands gouging it with Legos, blocks, matchbox cars and other random objects for many years.

It was weathered when weathered wasn't cool.


Now that my boys are getting older, the threat of furniture destruction is at an all-time low. I could safely fix up this table without fear that my work would be destroyed within a day.

Since I'm currently having a love affair with "duck egg blue" paint, I contemplated using it for this project. But I didn't want to be a one-trick pony, so I decided to try something new.


I dragged it outside and sanded it down to the natural wood. There was one funky strip of red wood that you can see on the right hand side.


Using foam brushes, I applied a couple coats of Minwax Weathered Oak stain.


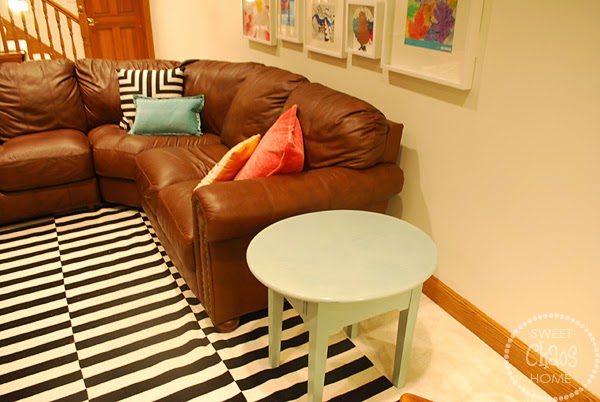
And this is how it turned out...


It has a unique look to it, which I'm kind of digging. There are some red and blue-ish undertones.


I should probably seal it with something, but for now I'm living with it the way it is.


Now it looks naturally weathered as opposed to "beat up."


School is out for summer in two hours! Yikes! I better go enjoy my last moments of freedom before the chaos really kicks in.

Have a great afternoon!!


Tuesday, May 27, 2014

Duck Egg Blue Furniture


Hey there! Hope you enjoyed your Memorial Day weekend.

We hosted a cookout/pool party on Sunday, so we were scrambling to get our backyard in shape. We did weeding and planting and cleaning and painting and outdoor furniture shopping. I told my husband that we should plan a party every weekend, so we are forced to get house projects done :) I'll share photos of the completed backyard soon.

If you follow me on Instagram, you may have seen pics of some furniture I painted recently. I have been dying to use Annie Sloan chalk paint in "Duck Egg Blue" for like, forever. Then one day I was looking at this table in my basement.


And I thought, "Wow. That table is really dusty."


Then I thought, "Wow. That table is really nicked up. Maybe I should freshen him up and paint him duck egg blue."

I'm a deep thinker.

So, I broke out my nasty drop cloth and started painting.


It was love at first sight. I wanted to paint my entire house duck egg blue. Oh wait… most of it is :)


Here's my little table looking much happier in his new coat of paint.


Now, I was so in love with duck egg blue that I couldn't stop with just one little table. I looked around for another piece to paint, and spied my next victim.


This little old dresser from Pier 1 sits in our sunroom and holds the kids' art supplies. Using "old white" and "duck egg," I gave him a more beachy, cottage-y look.


There was no method to my madness. I just slapped paint here and there, until it had a weathered look.


I don't know why it took me so long to use this paint color. I love it so.


Since I didn't post yesterday, I would just like to extend my heartfelt gratitude to all the men and women who have sacrificed for our freedom. 


Monday, May 19, 2014

Fabric Fairy Tale: Part Deux


I know the suspense was killing you, so I'm back with the second part of my fabric story.

When I last left you, I had decided that I would recover my basement chair cushions with this fabric…


"Funochio Parade" is its name. Wild and crazy is its game.

I'll admit this funky design is a little out of my comfort zone. I liked the sample swatch, but I wanted to see what this fabric looked like in a larger dose. So, I began googling it. Surely, someone somewhere had recovered a piece of furniture in it. Right?

Ummm… no.

Or, if they had, they weren't sharing it with the world wide web.

I was just going to have to trust that the chair would be fabulous.


It's got to be better than this, right?


Fast forward 24 hours. In preparation for another project, I am on line researching planked walls. My search eventually leads me to Sandra's blog, where I see this...


 Sandra's Closet


What the what!?? Is that Funochio Parade I spy on that adorable bench? It sure looks like it.

(This is the Twilight Zone moment I alluded to in my last post. Do-do-do-do.)

I immediately e-mail Sandra to find out. She graciously responds that she doesn't recall the name, but she purchased the fabric at Hobby Lobby a couple of years ago.

I know it's a long shot, but I hop in my car and head over to the Lobby of Hobby, hoping I might be able to find the fabric.

And guess what? I did!!!  A big fat bolt of Funochio was waiting right there for me.

And the best part? It was $24.99/yd + 40% off! Much better than the fabric store's price of $44.99/yd.

That meant a savings of $120!! Now, that's what I call a Happy Ending.


You were probably hoping Part Two of this story would mean an actual reveal of the chair with her new cushions, but you're going to have to wait a little longer for that. Not because I'm trying to turn this story into a novel, but because the cushions aren't done yet :)

However, I am making progress on the basement makeover. If you follow me on Instagram, you may have seen that I did some painting this weekend...


Be back soon to show you the latest…


Friday, May 16, 2014

A Fabric Fairy Tale


Once upon a time there was a basement…


And that basement was in the middle of a makeover.


But, while the floor and walls and built-ins were all getting dressed up for the ball, there remained a sad little chair with ugly plaid cushions.


She wished to be beautiful too. So I, her fairy godmother, decided to grant her wish.

I wanted to make her the belle of the ball in something fun and whimsical and durable, so that all the children in the land of the basement would love her and want to sit on her.


First, she tried on some cheetah prints.


But, they were a bit too serious.


Then she tried on Fabrico's "Pindo."


It was a no go.


She went ape in some "Funkey Monkey."


But the black background didn't brighten up the land of the basement (which has no natural light).


She tried on "Vanstory Gothic" and looked quite stunning…


But her fairy godmother worried about her getting dirty.


Finally, she tried on "Funochio Parade."


And, it was just right.

It was colorful and wild and soft as velvet. It was quirky and had sort of an "Anthro" vibe to it.


Soon the ugly duckling will be a beautiful swan in her new cushions. And, she will live happily ever after.

The End.


Okay, that's not exactly the end. There's more to the story of this fabric, and it's straight out of a fairy tale. Or maybe the Twilight Zone. Stay tuned for part two...


Thursday, May 15, 2014

A Master Bathroom Remodel (No… It's Not Mine Again)


One thing leads to another.

Such was the case with my parent's master bathroom.

It was a nice, neutral bathroom just minding its business. But, a pesky, recurring shower leak started to really wreak havoc. The shower would have to be torn apart. And, tearing apart the shower would mean replacing tile. And, if you're going to replace tile, you may as well just update the whole bathroom.

Right? Right. 

Here's how it started out…


BEFORE


My mother didn't want the expense of replacing the floor tile, so we worked with what she had. The changes we made were:


  • new tile for the shower and tub surround
  • shower was expanded a few inches, and the bench was removed
  • new frameless shower door
  • new cabinet hardware, faucets and lighting

Here's how it turned out…

AFTER

One of the challenges was finding tile to coordinate with the white tub, the off-white trim and cabinetry paint, and the beige floor tile. White subway tile (that wasn't too bright white) worked nicely. 

Can you ever go wrong with subway tile? I say no!


The mosaic accent tile, with a combination of green sea glass, tumbled travertine and carrara marble perfectly joined all the colors of the room together. 

Here is the shower before…


And after…


My parents decided to forego a shower bench in favor of a larger shower. If you ever do this, just keep in mind that a little ledge helps the ladies with the leg shaving!!

I recommended the shower head on a slide bar. It makes shower cleaning so much easier!!


You can catch a glimpse of the shower niche below...


Across from the tub and shower, the vanity got a little facelift. Here it is before…


We said buh bye to the shiny brass sconces and the combo chrome/brass fixtures. Pretty crystal knobs and new lighting freshen up the space.


The finishing touch will be a window treatment for the glass block bad boy. We shopped for fabric today, and I'll be sure to show you when it's finished.


My parents are really enjoying the updated space. So, I guess they should thank the leak that started it all :)